Preview Only
Oops! It looks like your security settings are blocking this video 🙁
If you are on a school computer or network, ask your tech person to whitelist these URLs:
*.wistia.com, fast.wistia.com, fast.wistia.net, embed-fastly.wistia.com, embed-cloudfront.wistia.com, embedwistia-a.akamaihd.net
Sometimes a simple refresh solves this issue. If you need further help, contact us.
Maps of Landforms Activity for Kids
Make a Landscape DIY
- Duration: 20-30 min
- Difficulty: Easy
- Cost: $0 to $10
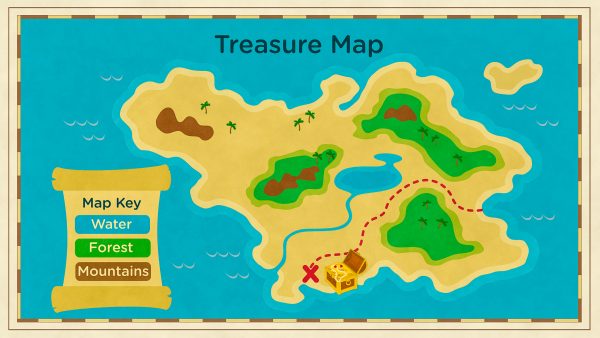
Make a map out of food and eat it when you are done!
Material List
- 1Paper plate
- 2Mixing bowls
- 1Pack of graham crackers
- 1Pack of cookies
- 1Container of frosting
- 1Blue and green food coloring
- 1Plastic fork or knife
- 1Pack of chocolate chips
- 1Sheet of paper
- 1Pack of colored pencils
Instructions
- 1Mix regular frosting and food coloring to make blue and green frosting.
- 2Spread green frosting on top of the graham crackers.
- 3Lay the graham crackers on one side to represent land.
- 4Make an ocean on the other side of the plate with blue frosting.
- 5Add mountains to the land by using chocolate chips.
- 6Now draw your map with colored pencils.
- 7Start by making a map key, then draw the shapes and color them in.
- 8Compare your drawn map to the one you made out of food.
Create A Free Account To Unlock All Content!
Get Full Access
Become A Member To Get Full Access!
Plans & Pricing
How It Works
Physical maps use shapes, colors and symbols to show us landforms. Scientists use maps to share what they know about the natural features of Earth’s surface; such as mountains, forests, lakes, rivers and islands. All maps should have a key, also called a legend, to help us understand the map.
Find More
Exciting Activities
More Activities
Browse All
Full Lessons
Watch Full Lessons
x
Choose Your Free Trial Period
Get 30 Days Free
By inviting 4 other teachers to try it too.
Skip, I will use a 3 day free trial
Thank You!
Enjoy your free 30 days trial
